Showing posts with label do it yourself. Show all posts

Tuesday, September 4, 2012

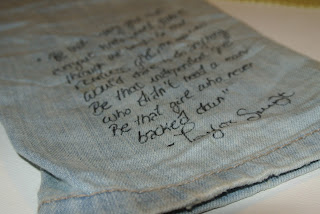
Back to DIY: Sisterhood Jeans a.k.a INSPIRING Jeans By Andrea

Hi Dolls! Whenever I feel like I am overthinking a certain situation and that I need to unwind I always fin cool DIY ideas to do so this one came fom me reminiscing about my favourite books ever: "The Sisterhood of the Travelling Pants" and tat cool pair of jeans. So, I decided to do one myself with my favourite quotes!

DIY


  1. Start from the bottom of the front part and keep writing your favourite quotes with different types of handwritting, all the way up. Then,do the same with the other part. I like going from the bottom up because I feel like this way I am more comfortable writting and more aware of the empty spaces ,I want to leave like that and the ones I want to write more.
Do you want to see the pair I created? 
 I took inspiration from a post I didabout confidence and from Pinterest ( Follow me shineonbyandrea)


Do you guys like this DIY?
 Tweet me! @shineonbyandrea
Pinterest: Shineonbyandrea Pose: shineonbyandrea
Youtube: www.youtube.com/shineonbyandrea

Sunday, September 2, 2012

Back to DIY! Rocker Chic Pencil Case

Hi Lovelies! So today's post is a DIY! I am going to be making back to school themed DIYs for all you who are interested in those so stay tuned!
Sin título #125


Brahmin
€28 - brahmin.com


American Apparel bags case
€5,58 - americanapparel.net


Beauty product
€1,50 - amazon.com


HobbyCraft 120ml Multi-Purpose Fabric Glue

€4,99 - direct.hobbycraft.co.uk


  1. Individually glue the studs to the pencil case carefully as the light fabric will slide them and you could mess up easily. you could glue them together or create a design. Be creative. You could sew them if the case material is not too thick and get amazing results too. It is completely up to you!
  2. Let it dry an entire night and add your favorite keychains to make it a bit more rocker chic. I love attaching beauty key chains that have a little real mascara or lip gloss attached. Those are fantastic!! Check out H&M for those ;) 

Do you guys enjoy DIY posts? Do you want me to share my college experience in some posts too? I think it is a great idea!
Twitter: @shineonbyandrea
Pinterest: shineonbyandrea ( Follow me!)
www.youtube.com/user/shineonbyandrea ( Agenda video comin' soon !)
shineonbyandrea@gmail.com

XXOO


Friday, August 24, 2012

2 DIYs in 1: Back to school glam keys + Cool Key Necklaces for your sorority

DIY

Hi Dolls! So today's post makes me so so excited! Because I love DIY's so so much and back to school is the best time to share a really cool one with you, my lovely readers!!
This DIY is useful for so many things like:

  1. To recycle your old keys that are not useful anymore, maybe because you changed home or something like that, you can also use your old diary keys to do this DIY or keys from old toys you used to have.
  2. To glam your keys so that you recognize your and run out the door easily in the morning.
  3. To have a cool project to do with your roommate, apartment mates or even with the other girls form your sorority just propose them this cool DIY and they will fall in love with it, plus this will be the perfect time to bond together.
Let's go ahead and get started!!

We need:
  •  keys
  • necklace or chain 
  •  nail polishes including glittery ones to glam up your life ;)
Steps to follow
  1. Paint the upper front part of your key, wait it to dry and do another coat so that the colour really shows up then do the same with the other part of the key. You can do a glittery nail polish coat once it is fully dried.
  2. Add them to your key chain or to the chain to create a cool necklace so that you expand your accessories collection and never loose your keys. Trust me living with other girls it is such a wonderful idea to carry them that easily.
  3. Make your unique add nails sticker to them and cover with clear nail polish or glue rhinestones, remember to just stay creative JUST in the upper part so that you can still use them!!

Hope you guys like it! Let me know in the comments if you like DIYs and what do you think of this one!


Contact me and requests to be on the next AndreaStyles post at shineonbyandrea@gmail.com
Twitter: @shineonbyandrea
Instagram a.k.a my obsession : shineonbyandrea
Youtube.com/user/shineonbyandrea


Tuesday, July 31, 2012

Back to College: Glam your Dorm Up - DIY Inspirational Board

Sin título #67

Sin título #70


Sin título #69


Hi Dolls! So today's post makes me so excited! BEcause is the First DIY I do here! As you are moving to dorms very soon and they are really boring and depressing at first! I wanted to show you a very easy DIY to pice it up as soon as you arrive!

DIY Inspirational cardboard


Beauty product
€0,82 - amazon.com

Models Own beauty product
€9,42 - asos.com


Friends Vinyl Words & Wall Quotes #12
€12 - wallquotes.com


€28 - etsy.com


HOW TO GLAM IT:


  1. Grab your old magazines and start finding cute bright pictures or pieces of clothes or jewelry that are cute to glue in between your pics, to decorate them even more.
  2. Print cute quotes, lyrics from your favorite songs and pics with your family, friends and even pets to add to our inspirational board.
  3. Glue them to your card board, you can also frame each picture with silver or gold pens or even with glitter glue pens. BE CREATIVE AND HAVE FUN WITH IT!
  4. Add a removable hanger so that you can hand it at your dorm without damaging the paint so you do not get charged for damages.

Sin título #71